Map Editor: Difference between revisions
| (105 intermediate revisions by 6 users not shown) | |||
| Line 1: | Line 1: | ||
Map Editor is an official tool, used to create custom maps. It can be found in the game folder as "h3maped.exe" and "h3hota_maped.exe" {{-wh}}. | Map Editor is an official tool, used to create custom maps. It can be found in the game folder as "h3maped.exe" ({{withmaped}}) and "h3hota_maped.exe"{{-wh}} ({{withmapedhota}}). | ||
= Map versions = | = Map versions = | ||
[[File:Map editor icon.png|left|Base Homm3 Map Editor]] | |||
[[File:Map editor icon (HotA).png|left|Updated HotA Map Editor]] | |||
Each expansion updated the map editor, adding new [[List_of_adventure_map_objects (HotA)|Adventure map objects]] and features; as a result, only maps with the same or older version than the one used by the editor itself can be created or altered. | Each expansion updated the map editor, adding new [[List_of_adventure_map_objects (HotA)|Adventure map objects]] and features; as a result, only maps with the same or older version than the one used by the editor itself can be created or altered. | ||
All changes made to a map using a more updated map editor than the one the map was originally made with will automatically update the map to the newer version. | All changes made to a map using a more updated map editor than the one the map was originally made with will automatically update the map to the newer version. | ||
The | The {{hota}} Map Editor {{withmapedhota}} is the most recently updated version of the editor.<sup>{{unk}}</sup> | ||
= Layout = | |||
The Map Editor consists of the following layout: | |||
[[File:H3hotamaped explained.png|1152px|frameless]] | |||
On the top of the Map Editor, from top to bottom, are placed the Menu bar, the Toolbar and the Mode bar. The map is placed in the middle, and around it are x- and y- coordinates. The minimap on the right shows the visible minimap of the currently shown layer. Below it lies the object bar, where currently chosen objects (be in on the Mode bar or using Tools -> Objects) are shown. | |||
You can browse the objects from a chosen category on the Object Bar, using the slider (changed for the mouse scroll in HotA {{withmapedhota}}). You can move the map using the sliders below and directly on the right of the map, or by using the arrow keys, the mouse scroll {{withmaped}} or by pressing the middle mouse button and moving the cursor towards the desired part of the map. | |||
* '' | = Menu bar tabs = | ||
* ''Undo'' and ''Redo'' ( | All of the following tabs and tools appear in the Menu bar. | ||
* ''Cut'', ''Copy'', ''Paste'' and ''Delete'' ( | |||
* The ''Find'' tool (Edit -> Find) can be used to find all objects of a specified object type on the map. It can be activated using Ctrl+F. The subsequent objects of the same type can be found by pressing F3. In [[HotA]], the search tool can be used to find [[Border Gate]]s, [[Keymaster's Tent]]s and [[Monolith]]s of a specified color ({{ | == File == | ||
[[File:File maped.png|200px|right|thumb|File menu]] | |||
* View -> ''Underground'' (Ctrl+ U) can be used to switch between the surface and the underground of the map, provided the map has an underground layer. | * All custom text in a map, including all timed events, [[Hero]] names, Hero backstories, [[Pandora's Box]]es and [[Event]]s messages, Artifact and Monster messages, etc. can be ''exported'' (through File -> Export Text) into a map_name.txt file, where map_name is the name of the map. The text can be then edited in any text editor, f.e. Notepad. As long as the placement of line breaks between custom texts and custom text descriptions are unaltered, this file can then be ''imported'' (via File -> Import Text) back into the map, replacing all custom text. | ||
* View -> ''Grid'' (Ctrl + G) can be used to view the grid separating each tile. | {{clear|both}} | ||
* View -> ''Passability'' (Ctrl + P) can be used to view the | ==Edit== | ||
[[File:Edit maped.png|200px|right|thumb|Edit menu]] | |||
* Edit -> ''Undo'' and ''Redo'' (also accessible on the Toolbar as the two arrows, or by pressing Ctrl + Z and Ctrl + Y respectively) can be used on any and all changes to the map. | |||
* 'Edit -> 'Cut'', ''Copy'', ''Paste'' and ''Delete'' (also available on the Toolbar) can be used on a single object at a time. They cannot be used on [[Terrain#Basic terrains|Basic Terrain]], [[Road]]s, or [[River]]s. These four tools can be activated using standard Windows keys, namely Ctrl + X, Ctrl + C, Ctrl + V and Delete. | |||
* The ''Find'' tool (Edit -> Find, or in the ) can be used to find all objects of a specified object type on the map. It can be activated using Ctrl+F. The subsequent objects of the same type can be found by pressing F3. In [[HotA]] {{withmapedhota}}, the search tool can be used to find [[Border Gate]]s, [[Keymaster's Tent]]s and [[Monolith]]s of a specified color ( {{withmapedhota}}). | |||
{{clear|both}} | |||
== View == | |||
[[File:View maped.png|200px|right|thumb|View menu]] | |||
* 'View -> ''Zoom in'' and View -> ''Zoom out'' (note that both are available on the Toolbar as looking glass icons with + and - sign, appropriately) | |||
* View -> ''Underground'' (Ctrl+ U) can be used to switch between the surface and the underground of the map, provided the map has an underground layer. It's also available on the Toolbar as a red arrow pointing downwards on a black square. | |||
* View -> ''Grid'' (Ctrl + G) can be used to view the grid separating each tile. This option is available on the right side of the Toolbar as a grid icon. | |||
* View -> ''Passability'' (Ctrl + P, or one yellow and 2 red squares on the Toolbar) can be used to view the accessibility of different objects and visit cells. This can allow the mapmaker to see which tiles are accessible from where, whether a monster guards an object, etc. Passability shows three tile colors: | |||
: * Red: These tiles are not passable (f.e. because they contain an obstacle or a part of an object). | |||
: * Yellow: These tiles are a part of objects and may be visited. Usually, they should be accessible. If they are surrounded by impassable tiles, they will be unreachable to heroes. | |||
: * Not-colour: These tiles are passable, but not interactable. | |||
: Note, that the exact passage to each object can be found by following the arrow-icons on the appropriate [[List of adventure map objects (HotA)|object's wiki entry]]. All monsters cover one tile and guard all tiles around them, except for land tiles by monsters placed on water and vice versa. | |||
* View -> ''Object animation'' (Ctrl + A) can be used to switch on or off the animation of all objects on the currently edited map. It is advised to turn off the animation when using slower devices. | * View -> ''Object animation'' (Ctrl + A) can be used to switch on or off the animation of all objects on the currently edited map. It is advised to turn off the animation when using slower devices. | ||
* View -> ''Terrain animation'' (Ctrl + T) can be used to switch on or off the animation of the terrain, particularly the water, on the currently edited map. It is advised to turn off the animation when using slower devices. | * View -> ''Terrain animation'' (Ctrl + T) can be used to switch on or off the animation of the terrain, particularly the water, on the currently edited map. It is advised to turn off the animation when using slower devices. | ||
* View -> ''Toolbar'', ''Mode Bar'' and ''Status Bar'' can be used to switch the | * View -> ''Toolbar'', ''Mode Bar'' and ''Status Bar'' can be used to switch the appropriate bars on or off. See the [[Map Editor#Layout]] | ||
{{clear|both}} | |||
* Tools -> ''Erase'' can be used to remove all objects except [[ | ==Tools== | ||
<span style='float:right;'> | |||
[[File:Eraser tool maped.png|Eraser tool]] | |||
[[File:Tools maped.png|200px|Tools menu]] | |||
</span> | |||
* Tools -> ''Erase'' (also available through the Mode Bar as the pencil eraser icon) can be used to remove all objects except [[Terrain#Basic terrains|Basic Terrains]]. The size of the brush is customizable - 1x1, 2x2, 4x4 or Area Brush. These Eraser brushes are available by pressing Shift + Z, Shift + X, Shift + C and Shift + V respectively. | |||
* Tools -> ''Validate Map'' (or pressing M {{withmapedhota}}) can be used to find errors or issues in the map. Note that maps may work without fixing some of the issues. Possible issues include, among others, lack of players, inaccessible visitable cells, lack of customization in the Map Specifications (particularly the title, description and the players), presence of [[Border Guard]]s without their appropriate [[Keymaster's Tent]]s and vice versa, presence of unconnected [[Monolith]]s or [[Subterranean Gate]]s and presence of [[Subterranean Gate]]s without the underground layer. Note that some issues will ''not'' be pointed by this tool, for example presence of Airships on Water, not next to shore (where they cannot be accessed). | |||
{{clear|both}} | |||
* Tools -> ''Options'' can be used to customize the following Map Editor features: | |||
** "Frequency of decorative terrain tiles" (they will automatically appear whenever a new terrain patch is placed), | |||
** "Repaint entire map with this setting" may be used to "beautify" the map with decorative terrain tiles. | |||
** "AutoSave options" (whether it's unabled and how often should the map AutoSave), | |||
** Object panel size (in the number of objects per line and the size of each object, respectively). | |||
==Player== | |||
<span style='float:right;'> | |||
[[File:Player maped.png|200px|Player]] | |||
</span> | |||
* Player -> ''No player'' and Player -> ''Player (number) (color)'' can be used to assign on all Towns, Mines, Creature Generators and Heroes ''placed after the setting was chosen'' to the currently chosen player. If the "No player" option is chosen, no Heroes can be placed on the map, and all new Towns, Mines and Creature Generators are assigned to be neutral. Note, that changing player once an object remains on the map will not have any effect on it. | |||
{{clear|both}} | |||
==Help== | |||
<span style='float:right;'> | |||
[[File:Help maped.png|Help]] | |||
</span> | |||
* Help. Seemingly, help does not work, except for the "About Map Editor" tab. <sup>{{unk}}</sup> | |||
{{clear|both}} | |||
= Tools = | |||
All of the following tools can be accessed via Tools ->, as well as by pressing their appropriate icons on the Mode bar. Their variations appear on the Object bar, replacing usual objects. | |||
{{clear|both}} | |||
== [[Terrain]] == | == [[Terrain]] == | ||
<span style='float:right;'> | |||
[[File:Terrain tool maped.png|Terrain tool]] | |||
[[File:Tools terrain maped.png|x200px|Tools -> Terrain]] | |||
</span> | |||
Terrain can be placed using the ''Terrain Tool'' (first icon on the Mode bar). The size of the brush is customizable - 1x1, 2x2, 4x4 or Area Brush (accessible on the Tool Bar, in Tools ->, as well as once "Z", "X", "C" or "V" are pressed {{withmapedhota}}, respectively), where the latter can be used to drag over a chosen area to cover it with the chosen terrain. Placing different types of terrain next to each other, particularly when using Rock or Water, causes the Map Editor to automatically adjust the shape of the terrain to best match the covered tiles. The Map Editor will try to minimize small pools of Water and Rock and connect nearby patches of a similar terrain. Note, that tiles that are half-land and half-water count as water tiles, and tiles that are half-land half-rock count as rock tiles (and half-water half-rock still counts as rock). | |||
In the HotA Map Editor {{withmapedhota}}, Terrains can be chosen by pressing the following keys: | |||
* 1: Dirt | |||
* 2: Sand | |||
1: Dirt | * 3: Grass | ||
2: Sand | * 4: Snow | ||
3: Grass | * 5: Swamp | ||
4: Snow | * 6: Rough | ||
5: Swamp | * 7: Subterranean | ||
6: Rough | * 8: Lava | ||
7: Subterranean | * 9: Highland | ||
8: Lava | * 0: Wasteland | ||
9: Highland | * -: Water | ||
0: Wasteland | * =: Rock | ||
-: Water | |||
=: Rock | |||
Note that for heroes on land, Water cells count as impassable (blocked) cells and vice versa. Rock is always impassable, and additionally, no objects may be placed on Rock (even if only one cell of an object lies on the Rock, the Map Editor will reject and revert that placement). | |||
{{clear|both}} | |||
== [[River]]s == | == [[River]]s == | ||
[[File:River tool maped.png|thumb|River tool]] | |||
Rivers can be placed using the ''River Tool''. There are 4 types of rivers available: | Rivers can be placed using the ''River Tool'' (second icon on the Mode bar). There are 4 types of rivers available: | ||
* Clear rivers (Alt + 1 {{ | * Clear rivers (Alt + 1 {{withmapedhota}}) | ||
* Icy rivers (Alt + 2 {{ | * Icy rivers (Alt + 2 {{withmapedhota}}) | ||
* Muddy rivers (Alt + 3 {{ | * Muddy rivers (Alt + 3 {{withmapedhota}}) | ||
* Lava rivers (Alt + 4 {{ | * Lava rivers (Alt + 4 {{withmapedhota}}) | ||
A special eraser for rivers is available under the same part of the toolbar (Alt + 5). | A special eraser for rivers is available under the same part of the toolbar (Alt + 5). | ||
| Line 56: | Line 114: | ||
Rivers may not be placed on Rock or Water terrain. | Rivers may not be placed on Rock or Water terrain. | ||
{{clear|both}} | |||
== [[Road]]s == | == [[Road]]s == | ||
[[File:Road tool maped.png|thumb|Road tool]] | |||
Roads can be placed using the ''Road Tool''. There are 3 types of roads available: | Roads can be placed using the ''Road Tool'' (3rd icon on the Mode bar). There are 3 types of roads available: | ||
* Dirt roads (Shift + 1 {{ | * Dirt roads (Shift + 1 {{withmapedhota}}) | ||
* Gravel roads (Shift + 2 {{ | * Gravel roads (Shift + 2 {{withmapedhota}}) | ||
* Cobblestone roads (Shift + 3 {{ | * Cobblestone roads (Shift + 3 {{withmapedhota}}) | ||
Roads have a special eraser, available under the same part of the toolbar (Shift + 4). | Roads have a special eraser, available under the same part of the toolbar (Shift + 4). | ||
| Line 67: | Line 126: | ||
Roads may not be placed on Rock or Water terrain. | Roads may not be placed on Rock or Water terrain. | ||
== Obstacles == | {{clear|both}} | ||
== Obstacles == | |||
Random, terrain-fitting obstacles can be placed on the map in a brushed area by using the Obstacle Tool. The obstacle brush can be "solid" (obstacles appear only and exactly on all passable and impassable tiles on which the solid brush was placed) or "fuzzy" (obstacles appear on all passable and impassable tiles of the solid part of the fuzzy brush, and ''may'' appear on random non-solid tiles on which the fuzzy brush was placed). The size of the brush is customizable (1x1, 2x2, 4x4, Area) and is accessible through Tools -> Obstacles or by pressing Shift + Q, Shift + W, Shift + E and Shift + R for the Solid Brush (respectively for each size) and Shift + Alt + Q, Shift + Alt + W, Shift + Alt + E, Shift + Alt + R for the fuzzy brush (again, respectively for each size). | <span style='float:right;'> | ||
[[File:Obstacle tool maped.png|x200px|Obstacle tool before selecting area]] | |||
[[File:Brush tool maped 2.png|x200px|Obstacle tool after selecting area]] | |||
</span> | |||
Random, terrain-fitting obstacles can be placed on the map in a brushed area by using the Obstacle Tool (5th icon on the Mode bar). The obstacle brush can be "solid" (obstacles appear only and exactly on all passable and impassable tiles on which the solid brush was placed) or "fuzzy" (obstacles appear on all passable and impassable tiles of the solid part of the fuzzy brush, and ''may'' appear on random non-solid tiles on which the fuzzy brush was placed). The size of the brush is customizable (1x1, 2x2, 4x4, Area) and is accessible through Tools -> Obstacles or by pressing Shift + Q, Shift + W, Shift + E and Shift + R for the Solid Brush (respectively for each size) and Shift + Alt + Q, Shift + Alt + W, Shift + Alt + E, Shift + Alt + R for the fuzzy brush (again, respectively for each size). | |||
Obstacle tool has its own Eraser that can be used to clear the solid or fuzzy brush. The "solid eraser" removes both the solid and the fuzzy brush, while the "fuzzy eraser" removes the solid and the fuzzy brush and replaces all tiles marked with either obstacle brush surrounding the cleared tiles with a fuzzy obstacle tool brush. The obstacle erasers are accessible through Tools -> Obstacles, as well as by pressing Shift + A, Shift + S, Shift + D and Shift + F for the solid eraser (respectively for each size) or Shift + Alt + A, Shift + Alt + S, Shift + Alt + D and Shift + Alt + F for the fuzzy eraser (again, respectively for each size). | Obstacle tool has its own Eraser that can be used to clear the solid or fuzzy brush. The "solid eraser" removes both the solid and the fuzzy brush, while the "fuzzy eraser" removes the solid and the fuzzy brush and replaces all tiles marked with either obstacle brush surrounding the cleared tiles with a fuzzy obstacle tool brush. The obstacle erasers are accessible through Tools -> Obstacles, as well as by pressing Shift + A, Shift + S, Shift + D and Shift + F for the solid eraser (respectively for each size) or Shift + Alt + A, Shift + Alt + S, Shift + Alt + D and Shift + Alt + F for the fuzzy eraser (again, respectively for each size). | ||
Once the desired area is brushed with either fuzzy or solid brush strokes, the mapmaker may use the Place Obstacles tool (Shift + O) to fill the brushed area with random, terrain-fitting obstacles. | Once the desired area is brushed with either fuzzy or solid brush strokes, the mapmaker may use the Place Obstacles tool (Shift + O) to fill the brushed area with random, terrain-fitting obstacles. | ||
{{clear|both}} | |||
== Objects == | == Objects == | ||
See: [[Map Editor - Objects]]. | |||
== Map Specifications == | |||
Map Specifications, accessible through Tools ->, as well as by pressing Ctrl+Enter, consist of various customizable map rules. | |||
=== General === | |||
The general map specifications specify: | |||
* [[ | * Map version. Note, that Map Editors cannot recognize other map versions than those they can save as; as a result, [[SoD]] Map Editor {{withmaped}} will only recognize [[RoE]]{{-wr}}, [[AB]]{{-wa}} and [[SoD]]{{-ws}} map versions. The [[HotA]] Map Editor {{withmapedhota}} will state the map version to be HotA, even if the last saved edit was done in an older map editor version. | ||
* Map [[Difficulty|difficulty]]. Note, that despite what the [[Difficulty]] page states, Easy, Normal, Hard, Expert and Impossible Map difficulty determine AI behaviour and are entirely separate from 80%, 100%, 130%, 160%, 200% (also known as Easy, Normal, Hard, Expert, Impossible) game difficulty, which primarily controls human and AI resources, AI growth and resource growth as well as the AI behaviour, but to a much lesser extent. Map difficulty is set here in the Map Specifications, while the game difficulty is set by the player when starting a scenario. | |||
* Allowed game Difficulty {{withmapedhota}}. The player will not be able to select other difficulty than one from the list. | |||
* Existance of the underground ("Two level map"). Note, that the Underground may be added or removed during the game. | |||
* Whether monster/plague weeks should be allowed {{withmapedhota}}. If disabled, all weeks will have no effect. | |||
* [[ | * Whether the map is an Arena {{withmapedhota}}.As the Map Editor itself states: "An arena map is a map designed for a single fight of two heroes with a preliminary preparation. Such map must contain at least one combat place." The HotA Map Editor will warn the first time a map is set as an Arena; however, disagreeing with the message (to revert the change) has no effect and the message never reappears. | ||
* Hero experience level limit. Heroes will not be able to level up past that level. This option is unavailable in {{roe}}. See: [[Map Editor - Objects#Heroes]] for more information. | |||
* | * Combat round limit {{withmapedhota}}: This can be used to limit players from using strategies such as [[Harpy Hag]] kiting. The limit will apply to all battles, and once it's crossed, the attacking player will automatically lose. | ||
* | * Map name (max 30 characters; this field is required for maps to be visible in the game). | ||
* | * Map description (max 300 characters). | ||
* | |||
* | |||
* | |||
=== Player Specs === | |||
For each player present on the map (i.e. with at least one hero or one town), the following specifications can be applied: | |||
* [[ | * Has main town: This option seems to only have an effect on the AI behaviour and for generation of starting heroes. | ||
* Generate hero at Random Town: A random hero will be added to the map once the scenario is started, as the visitor of the main town. The random hero will be replaced by a chosen hero when selecting a scenario. Note, that the randomly generated hero is created ''after'' other random heroes on the map are assigned, and therefore if a player has one or more Random Heroes and has a random hero generated for them at their main town, they will only be able to customize one of the Random Heroes, and not the generated one, when choosing their starting town and hero. | |||
* Playability: A player may be both available for the AI and the Human player, or only for the AI. | |||
* Forbid hiring heroes {{withmapedhota}}: This option can be used to make the player unable to ever hire any heroes, including his own heroes if they surrender or flee combat. Use it with caution. | |||
* Behavior: This setting can be used to specify the behaviour of the AI player (by default it is random). For more information, see: [[AI Behavior]]. | |||
* Allowed Alignments: (by default "Random") state which Towns are available to the player. The Random town pool will only roll from the available towns. | |||
=== Teams === | |||
If teams are enabled, up to 7 teams may be set with each player belonging to one, chosen Team. Teams cannot be customized if there are less than 3 players on the map. | |||
=== Rumors === | |||
Rumors appear in the Tavern. If customized, the prepared rumors will take precedence over the generic ones. | |||
=== | === Special Victory condition === | ||
Special Victory condition may be set to one of the following: | |||
* [[File:Defeat All Enemies.png]] None (therefore only the standard condition, Defeat all enemies, applies); | |||
* [[File:Acquire Artifact.png]] Acquire a specific artifact.<sup>1</sup> The specific Artifact can be the Grail, but it cannot be a Spell Scroll. The artifact does ''not'' have to exist on the map or be allowed in the Map Specifications. | |||
* [[File:Accumulate Creatures.png]] Accumulate creatures.<sup>1,2</sup> A chosen amount of a specific creature can be set. Note, that the mapmaker may not specify more than one creature type here. | |||
* [[File:Accumulate Resources.png]] Accumulate resources.<sup>1,2</sup> A chosen amount of one specific resource can be set. | |||
* [[File:Upgrade Town.png]] Upgrade a specific Town.<sup>2</sup> One Hall upgrade and one Castle level must be chosen. | |||
* [[File:Build a Grail Structure.png]] Build the Grail structure. The destination town for the Grail may be customized, or left as default - Any Town. Note, that if a player builds the Grail structure in a town other than the one chosen, the game won't end until only one player remains. | |||
* [[File:Defeat All Monsters.png]] Eliminate all monsters {{withmapedhota}}.<sup>2</sup> | |||
* [[File:Defeat Hero.png]] Defeat a specific hero. The hero must be present on the map or in Prison. Note, that if a player is the owner of the hero, either through hiring them or starting with them, they cannot win the game. If the hero is defeated by somebody else than the player (f.e. a Dragon Utopia), the game is not finished until only one player remains. | |||
* [[File:Capture Town.png]] Capture a specific town.<sup>1,2</sup> | |||
* [[File:Defeat Monster.png]] Defeat a specific monster.<sup>2</sup> The monster must be present somewhere on the map. | |||
* [[File:Flag All Creature Dwellings.png]] Flag all creature dwellings.<sup>1,2</sup> | |||
* [[File:Flag All Mines.png]] Flag all mines.<sup>1,2</sup> | |||
* [[File:Transport Artifact.png]] Transport a specific artifact.<sup>1</sup> The specific Artifact can be the Grail, but it cannot be a Spell Scroll. The artifact does ''not'' have to exist on the map or be allowed in the Map Specifications. The destination town must be customized. | |||
* [[File:Survive Until Time Expires.png]] Survive for a certain time {{withmapedhota}}.<sup>2</sup> After the chosen time, the first human player in player order (1-8) automatically wins. | |||
<sup>1</sup> For these victory conditions, the special victory condition may be set to also apply to computer opponents. | |||
<br><sup>2</sup> For these victory conditions, standard victory (defeat all enemies) can also be set. If it is not set, the game will go on until the special victory condition is met. | |||
Note, that special victory conditions for which applicability of the standard victory condition (defeat all enemies) ''cannot'' be customized (Acquire Artifact, Transport Artifact, Build a Grail structure) by default allow the standard victory condition. | |||
=== Special Loss condition === | |||
* [[File:Lose All Your Towns and Heroes.png]] None: The players lose when they lose all their towns and heroes, or they don't have any towns for a period of at least 7 days. | |||
* [[File:Lose Town.png]] Lose a specific town: The town must be specified. The first ''player'' (including AI) to lose this town loses the game. The town does ''not'' have to be under the control of any players for this condition to be set. If the town is neutral, conquering it for the first time will ''not'' result in a victory/loss. | |||
* [[File:Lose Hero.png]] Lose a specific hero: The first player (including AI) to lose this hero loses the game. Note, that the hero may be imprisoned. | |||
* [[File:Time Expires.png]] Time expires: The first human player to start their turn on the chosen date loses the game. | |||
=== | === Timed Events === | ||
An unlimited number of timed events can be added. Timed events automatically sort by date, but their order on a specific day can be customized, using "Move Up" and "Move Down" buttons. The following properties of events may be edited: | |||
* General: | |||
** Event name: This name only appears in the Map Editor and can help the mapmaker organize their work. | |||
** Message: This message will play out to the players as the Event takes place. | |||
** Players to which it applies: Specific players may be added to ignore this event. At least one player has to be marked. | |||
** Apply event to human players: If ticked, the event will ''also'' apply to humans. | |||
** Apply event to computer players: If ticked, the event will ''also'' apply to AI. Note, that at least one of these two options has to be marked. | |||
** Day of first occurrence: The event will play on the chosen date. | |||
** Subsequent occurrences: If set to "Never", the event will not repeat. If set to a different value, the event will repeat every chosen time interval. Note, that repeating events take priority over other events lower down the list. | |||
* Resources: Here, resources given or taken from the player to which the event applies may be customized. | |||
Note that some timed events only apply to specific towns. See: [[Map Editor - Objects#Town properties]] | |||
=== Heroes === | |||
The mapmaker can ban, enable and edit chosen heroes. This includes campaign heroes (such as [[Gelu]], [[Dracon]] or [[Frederick]], as well as banned-by-default heroes (such as [[Galthran]] in {{hota}}). | |||
=== [[ | ==== Editing Heroes ==== | ||
For editing heroes placed on the map, see [[Map Editor - Objects#Hero properties]]. | |||
Heroes can be customized on the map as a whole in the following ways: | |||
* General | |||
** Name. | |||
** Experience (and Experience level {{withmapedhota}}). | |||
** Portrait. Note, that portraits ''can'' repeat between different heroes; on top of that, heroes may use campaign portraits. | |||
** Gender. This only changes the appearance on the map. | |||
** Always add skills {{withmapedhota}}: If set to true, the hero will gain extra skills from the additional experience customized above. | |||
** Hero can't gain experience {{withmapedhota}}: If set to true, the hero will not be able to gain any experience, no matter the experience level limit for the map. | |||
** May be hired by: The following players may hire this hero. Other players will not see the hero in the tavern, or in the Adventure Map [[Tavern]]. Note, that heroes in [[Prison]]s or [[Hero Camp]]s{{-wh}} may be hired, even if this option states otherwise. | |||
* Biography. | |||
* Primary skills: These are the ''starting'' primary skills. Higher level heroes will be automatically levelled up, and therefore will have the appropriately higher primary skills. | |||
* Secondary skills: These are the ''starting'' secondary skills. See Primary skills. | |||
* Artifacts: Various artifacts, excluding the Grail and Spell scrolls {{withmaped}} (available in {{hota}}), may be added here. | |||
** Has spellbook. | |||
* Spells: These spells will appear in the hero's spellbook, provided he has one, at the beginning of the game. | |||
Note, that specialities and starting armies may ''not'' be customized. Therefore it is advised to customize a hero with the appropriate specialty to fit your desired hero. | |||
=== Artifacts === | |||
Chosen artifacts may be banned here. They will not be ''randomly'' spawned as a reward or as a replacement for Random Artifacts. They may still be added to Heroes, Creature Banks, Seer's Hut rewards or placed on the map by the mapmaker. | |||
=== Spells === | |||
The mapmaker may ban chosen spells here (only in {{sod}} and {{hota}} Map Editor). They will not ''randomly'' spawn in Mage guilds or Spell scrolls and won't be accessible from artifacts such as Spell scrolls, [[Tome of Air|Tomes of elements]] or the [[Spellbinder's Hat]]. Adding them to a Mage guild manually won't work. | |||
=== Secondary skills === | |||
Available secondary skills can be customized by banning or enabling chosen skills. Heroes who start with a banned skill will still be able to upgrade them, but other heroes won't be able to learn these skills, apart from the Universities (as long as they're customized to give the chosen skill), customized Scholars, Events and Pandora's Boxes. Witch Huts will automatically ignore banned skills when choosing a random skill to teach, and if customized to only provide a banned skill, will appear empty, with an appropriate message. | |||
{{Fanopinion| | |||
For further support with the Map Editor, see [[Map Editor - Guide]]. | |||
}}<!-- end of fan opinion --> | |||
< | |||
= Gallery = | = Gallery = | ||
<gallery> | <gallery> | ||
File:Map | File:Road and Monster cell explanation.png|Road and monster-guarded cells explained {{withmaped}} (identical in the [[HotA]] Map Editor {{withmapedhota}}) | ||
File:Map | File:Right-click objects maped.png|Right-clicking objects in the Map Editor {{withmapedhota}} (identical in the [[Shadow of Death]] Map Editor {{withmaped}}) | ||
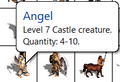
File: | File:Monster what's this maped.png|What's This? For monsters {{withmapedhota}} | ||
File:Add artifact to hero.png|Add artifact to hero | File:Right-click monster maped.png|Right-clicking monsters on the right bar of the Map Editor {{withmapedhota}} (identical in the [[Shadow of Death]] Map Editor {{withmaped}}) | ||
File:Add artifact to hero (HotA).png| | File:Warning no available heroes maped.png|Warning that displays when hero limit is exceeded {{withmapedhota}} (identical in the [[Shadow of Death]] Map Editor {{withmaped}}) | ||
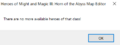
File:Player0 Warning Maped.png|Warning that displays when no player is chosen when placing a hero {{withmapedhota}} (identical in the [[Shadow of Death]] Map Editor {{withmaped}}) | |||
File:Add artifact to hero.png|Add artifact to hero | |||
File:Add artifact to hero (HotA).png|Add artifact to hero ({{hota}}) | |||
File:Lighthouse properties.png|Lighthouse properties | |||
</gallery> | </gallery> | ||
{{Map Editor 'see also'}} | |||
* [[Map | |||
External resources (in Polish only): | |||
* [https://www.heroes3.eu/porady/poradnik-mapmakera/edytor-map-bez-tajemnic Edytor Map bez tajemnic - jak skutecznie z niego korzystać]. [English title: Map Editor - how to successfully use it]. | |||
* [https://www.heroes3.eu/porady/poradnik-mapmakera/wypelnienie-mapy Mapa Przygody - część 1: Wypełnienie mapy]. [English title: Adventure Map - part 1: Filling the map]. | |||
* [https://www.heroes3.eu/porady/poradnik-mapmakera/zagospodarowanie-terenu Mapa Przygody - część 2: Zagospodarowanie terenu]. [English title: Adventure Map - part 2: Land development]. | |||
[[Category:Map Editor]] | [[Category:Map Editor]] | ||
Latest revision as of 01:32, 20 April 2024
Map Editor is an official tool, used to create custom maps. It can be found in the game folder as "h3maped.exe" (![]() ) and "h3hota_maped.exe"
) and "h3hota_maped.exe" ![]() (
(![]() ).
).
Map versions[edit]
Each expansion updated the map editor, adding new Adventure map objects and features; as a result, only maps with the same or older version than the one used by the editor itself can be created or altered.
All changes made to a map using a more updated map editor than the one the map was originally made with will automatically update the map to the newer version.
The Horn of the Abyss Map Editor ![]() is the most recently updated version of the editor.???
is the most recently updated version of the editor.???
Layout[edit]
The Map Editor consists of the following layout:

On the top of the Map Editor, from top to bottom, are placed the Menu bar, the Toolbar and the Mode bar. The map is placed in the middle, and around it are x- and y- coordinates. The minimap on the right shows the visible minimap of the currently shown layer. Below it lies the object bar, where currently chosen objects (be in on the Mode bar or using Tools -> Objects) are shown.
You can browse the objects from a chosen category on the Object Bar, using the slider (changed for the mouse scroll in HotA ![]() ). You can move the map using the sliders below and directly on the right of the map, or by using the arrow keys, the mouse scroll
). You can move the map using the sliders below and directly on the right of the map, or by using the arrow keys, the mouse scroll ![]() or by pressing the middle mouse button and moving the cursor towards the desired part of the map.
or by pressing the middle mouse button and moving the cursor towards the desired part of the map.
Menu bar tabs[edit]
All of the following tabs and tools appear in the Menu bar.
File[edit]

- All custom text in a map, including all timed events, Hero names, Hero backstories, Pandora's Boxes and Events messages, Artifact and Monster messages, etc. can be exported (through File -> Export Text) into a map_name.txt file, where map_name is the name of the map. The text can be then edited in any text editor, f.e. Notepad. As long as the placement of line breaks between custom texts and custom text descriptions are unaltered, this file can then be imported (via File -> Import Text) back into the map, replacing all custom text.
Edit[edit]

- Edit -> Undo and Redo (also accessible on the Toolbar as the two arrows, or by pressing Ctrl + Z and Ctrl + Y respectively) can be used on any and all changes to the map.
- 'Edit -> 'Cut, Copy, Paste and Delete (also available on the Toolbar) can be used on a single object at a time. They cannot be used on Basic Terrain, Roads, or Rivers. These four tools can be activated using standard Windows keys, namely Ctrl + X, Ctrl + C, Ctrl + V and Delete.
- The Find tool (Edit -> Find, or in the ) can be used to find all objects of a specified object type on the map. It can be activated using Ctrl+F. The subsequent objects of the same type can be found by pressing F3. In HotA
 , the search tool can be used to find Border Gates, Keymaster's Tents and Monoliths of a specified color ( ).
View[edit]

- 'View -> Zoom in and View -> Zoom out (note that both are available on the Toolbar as looking glass icons with + and - sign, appropriately)
- View -> Underground (Ctrl+ U) can be used to switch between the surface and the underground of the map, provided the map has an underground layer. It's also available on the Toolbar as a red arrow pointing downwards on a black square.
- View -> Grid (Ctrl + G) can be used to view the grid separating each tile. This option is available on the right side of the Toolbar as a grid icon.
- View -> Passability (Ctrl + P, or one yellow and 2 red squares on the Toolbar) can be used to view the accessibility of different objects and visit cells. This can allow the mapmaker to see which tiles are accessible from where, whether a monster guards an object, etc. Passability shows three tile colors:
- * Red: These tiles are not passable (f.e. because they contain an obstacle or a part of an object).
- * Yellow: These tiles are a part of objects and may be visited. Usually, they should be accessible. If they are surrounded by impassable tiles, they will be unreachable to heroes.
- * Not-colour: These tiles are passable, but not interactable.
- Note, that the exact passage to each object can be found by following the arrow-icons on the appropriate object's wiki entry. All monsters cover one tile and guard all tiles around them, except for land tiles by monsters placed on water and vice versa.
- View -> Object animation (Ctrl + A) can be used to switch on or off the animation of all objects on the currently edited map. It is advised to turn off the animation when using slower devices.
- View -> Terrain animation (Ctrl + T) can be used to switch on or off the animation of the terrain, particularly the water, on the currently edited map. It is advised to turn off the animation when using slower devices.
- View -> Toolbar, Mode Bar and Status Bar can be used to switch the appropriate bars on or off. See the Map Editor#Layout
Tools[edit]


- Tools -> Erase (also available through the Mode Bar as the pencil eraser icon) can be used to remove all objects except Basic Terrains. The size of the brush is customizable - 1x1, 2x2, 4x4 or Area Brush. These Eraser brushes are available by pressing Shift + Z, Shift + X, Shift + C and Shift + V respectively.
- Tools -> Validate Map (or pressing M ) can be used to find errors or issues in the map. Note that maps may work without fixing some of the issues. Possible issues include, among others, lack of players, inaccessible visitable cells, lack of customization in the Map Specifications (particularly the title, description and the players), presence of Border Guards without their appropriate Keymaster's Tents and vice versa, presence of unconnected Monoliths or Subterranean Gates and presence of Subterranean Gates without the underground layer. Note that some issues will not be pointed by this tool, for example presence of Airships on Water, not next to shore (where they cannot be accessed).
- Tools -> Options can be used to customize the following Map Editor features:
- "Frequency of decorative terrain tiles" (they will automatically appear whenever a new terrain patch is placed),
- "Repaint entire map with this setting" may be used to "beautify" the map with decorative terrain tiles.
- "AutoSave options" (whether it's unabled and how often should the map AutoSave),
- Object panel size (in the number of objects per line and the size of each object, respectively).
Player[edit]

- Player -> No player and Player -> Player (number) (color) can be used to assign on all Towns, Mines, Creature Generators and Heroes placed after the setting was chosen to the currently chosen player. If the "No player" option is chosen, no Heroes can be placed on the map, and all new Towns, Mines and Creature Generators are assigned to be neutral. Note, that changing player once an object remains on the map will not have any effect on it.
Help[edit]

- Help. Seemingly, help does not work, except for the "About Map Editor" tab. ???
Tools[edit]
All of the following tools can be accessed via Tools ->, as well as by pressing their appropriate icons on the Mode bar. Their variations appear on the Object bar, replacing usual objects.
Terrain[edit]

 Terrain can be placed using the Terrain Tool (first icon on the Mode bar). The size of the brush is customizable - 1x1, 2x2, 4x4 or Area Brush (accessible on the Tool Bar, in Tools ->, as well as once "Z", "X", "C" or "V" are pressed
 ![]() , respectively), where the latter can be used to drag over a chosen area to cover it with the chosen terrain. Placing different types of terrain next to each other, particularly when using Rock or Water, causes the Map Editor to automatically adjust the shape of the terrain to best match the covered tiles. The Map Editor will try to minimize small pools of Water and Rock and connect nearby patches of a similar terrain. Note, that tiles that are half-land and half-water count as water tiles, and tiles that are half-land half-rock count as rock tiles (and half-water half-rock still counts as rock).
, respectively), where the latter can be used to drag over a chosen area to cover it with the chosen terrain. Placing different types of terrain next to each other, particularly when using Rock or Water, causes the Map Editor to automatically adjust the shape of the terrain to best match the covered tiles. The Map Editor will try to minimize small pools of Water and Rock and connect nearby patches of a similar terrain. Note, that tiles that are half-land and half-water count as water tiles, and tiles that are half-land half-rock count as rock tiles (and half-water half-rock still counts as rock).
In the HotA Map Editor ![]() , Terrains can be chosen by pressing the following keys:
, Terrains can be chosen by pressing the following keys:
- 1: Dirt
- 2: Sand
- 3: Grass
- 4: Snow
- 5: Swamp
- 6: Rough
- 7: Subterranean
- 8: Lava
- 9: Highland
- 0: Wasteland
- -: Water
- =: Rock
Note that for heroes on land, Water cells count as impassable (blocked) cells and vice versa. Rock is always impassable, and additionally, no objects may be placed on Rock (even if only one cell of an object lies on the Rock, the Map Editor will reject and revert that placement).
Rivers[edit]

Rivers can be placed using the River Tool (second icon on the Mode bar). There are 4 types of rivers available:
- Clear rivers (Alt + 1 )
- Icy rivers (Alt + 2 )
- Muddy rivers (Alt + 3 )
- Lava rivers (Alt + 4 )
A special eraser for rivers is available under the same part of the toolbar (Alt + 5).
Rivers may not be placed on Rock or Water terrain.
Roads[edit]

Roads can be placed using the Road Tool (3rd icon on the Mode bar). There are 3 types of roads available:
- Dirt roads (Shift + 1 )
- Gravel roads (Shift + 2 )
- Cobblestone roads (Shift + 3 )
Roads have a special eraser, available under the same part of the toolbar (Shift + 4).
Roads may not be placed on Rock or Water terrain.
Obstacles[edit]

 Random, terrain-fitting obstacles can be placed on the map in a brushed area by using the Obstacle Tool (5th icon on the Mode bar). The obstacle brush can be "solid" (obstacles appear only and exactly on all passable and impassable tiles on which the solid brush was placed) or "fuzzy" (obstacles appear on all passable and impassable tiles of the solid part of the fuzzy brush, and may appear on random non-solid tiles on which the fuzzy brush was placed). The size of the brush is customizable (1x1, 2x2, 4x4, Area) and is accessible through Tools -> Obstacles or by pressing Shift + Q, Shift + W, Shift + E and Shift + R for the Solid Brush (respectively for each size) and Shift + Alt + Q, Shift + Alt + W, Shift + Alt + E, Shift + Alt + R for the fuzzy brush (again, respectively for each size).
Obstacle tool has its own Eraser that can be used to clear the solid or fuzzy brush. The "solid eraser" removes both the solid and the fuzzy brush, while the "fuzzy eraser" removes the solid and the fuzzy brush and replaces all tiles marked with either obstacle brush surrounding the cleared tiles with a fuzzy obstacle tool brush. The obstacle erasers are accessible through Tools -> Obstacles, as well as by pressing Shift + A, Shift + S, Shift + D and Shift + F for the solid eraser (respectively for each size) or Shift + Alt + A, Shift + Alt + S, Shift + Alt + D and Shift + Alt + F for the fuzzy eraser (again, respectively for each size).
Once the desired area is brushed with either fuzzy or solid brush strokes, the mapmaker may use the Place Obstacles tool (Shift + O) to fill the brushed area with random, terrain-fitting obstacles.
Objects[edit]
See: Map Editor - Objects.
Map Specifications[edit]
Map Specifications, accessible through Tools ->, as well as by pressing Ctrl+Enter, consist of various customizable map rules.
General[edit]
The general map specifications specify:
- Map version. Note, that Map Editors cannot recognize other map versions than those they can save as; as a result, SoD Map Editor
 will only recognize RoE
  , AB
, AB  and SoD
  map versions. The HotA Map Editor will state the map version to be HotA, even if the last saved edit was done in an older map editor version.
 - Map difficulty. Note, that despite what the Difficulty page states, Easy, Normal, Hard, Expert and Impossible Map difficulty determine AI behaviour and are entirely separate from 80%, 100%, 130%, 160%, 200% (also known as Easy, Normal, Hard, Expert, Impossible) game difficulty, which primarily controls human and AI resources, AI growth and resource growth as well as the AI behaviour, but to a much lesser extent. Map difficulty is set here in the Map Specifications, while the game difficulty is set by the player when starting a scenario.
- Allowed game Difficulty . The player will not be able to select other difficulty than one from the list.
- Existance of the underground ("Two level map"). Note, that the Underground may be added or removed during the game.
- Whether monster/plague weeks should be allowed . If disabled, all weeks will have no effect.
- Whether the map is an Arena .As the Map Editor itself states: "An arena map is a map designed for a single fight of two heroes with a preliminary preparation. Such map must contain at least one combat place." The HotA Map Editor will warn the first time a map is set as an Arena; however, disagreeing with the message (to revert the change) has no effect and the message never reappears.
- Hero experience level limit. Heroes will not be able to level up past that level. This option is unavailable in Restoration of Erathia. See: Map Editor - Objects#Heroes for more information.
- Combat round limit : This can be used to limit players from using strategies such as Harpy Hag kiting. The limit will apply to all battles, and once it's crossed, the attacking player will automatically lose.
- Map name (max 30 characters; this field is required for maps to be visible in the game).
- Map description (max 300 characters).
Player Specs[edit]
For each player present on the map (i.e. with at least one hero or one town), the following specifications can be applied:
- Has main town: This option seems to only have an effect on the AI behaviour and for generation of starting heroes.
- Generate hero at Random Town: A random hero will be added to the map once the scenario is started, as the visitor of the main town. The random hero will be replaced by a chosen hero when selecting a scenario. Note, that the randomly generated hero is created after other random heroes on the map are assigned, and therefore if a player has one or more Random Heroes and has a random hero generated for them at their main town, they will only be able to customize one of the Random Heroes, and not the generated one, when choosing their starting town and hero.
- Playability: A player may be both available for the AI and the Human player, or only for the AI.
- Forbid hiring heroes : This option can be used to make the player unable to ever hire any heroes, including his own heroes if they surrender or flee combat. Use it with caution.
- Behavior: This setting can be used to specify the behaviour of the AI player (by default it is random). For more information, see: AI Behavior.
- Allowed Alignments: (by default "Random") state which Towns are available to the player. The Random town pool will only roll from the available towns.
Teams[edit]
If teams are enabled, up to 7 teams may be set with each player belonging to one, chosen Team. Teams cannot be customized if there are less than 3 players on the map.
Rumors[edit]
Rumors appear in the Tavern. If customized, the prepared rumors will take precedence over the generic ones.
Special Victory condition[edit]
Special Victory condition may be set to one of the following:
 None (therefore only the standard condition, Defeat all enemies, applies);
 Acquire a specific artifact.1 The specific Artifact can be the Grail, but it cannot be a Spell Scroll. The artifact does not have to exist on the map or be allowed in the Map Specifications.
 Accumulate creatures.1,2 A chosen amount of a specific creature can be set. Note, that the mapmaker may not specify more than one creature type here.
 Accumulate resources.1,2 A chosen amount of one specific resource can be set.
 Upgrade a specific Town.2 One Hall upgrade and one Castle level must be chosen.
 Build the Grail structure. The destination town for the Grail may be customized, or left as default - Any Town. Note, that if a player builds the Grail structure in a town other than the one chosen, the game won't end until only one player remains.
 Eliminate all monsters .2
 Defeat a specific hero. The hero must be present on the map or in Prison. Note, that if a player is the owner of the hero, either through hiring them or starting with them, they cannot win the game. If the hero is defeated by somebody else than the player (f.e. a Dragon Utopia), the game is not finished until only one player remains.
 Capture a specific town.1,2
 Defeat a specific monster.2 The monster must be present somewhere on the map.
 Flag all creature dwellings.1,2
 Flag all mines.1,2
 Transport a specific artifact.1 The specific Artifact can be the Grail, but it cannot be a Spell Scroll. The artifact does not have to exist on the map or be allowed in the Map Specifications. The destination town must be customized.
 Survive for a certain time .2 After the chosen time, the first human player in player order (1-8) automatically wins.
1 For these victory conditions, the special victory condition may be set to also apply to computer opponents.
2 For these victory conditions, standard victory (defeat all enemies) can also be set. If it is not set, the game will go on until the special victory condition is met.
Note, that special victory conditions for which applicability of the standard victory condition (defeat all enemies) cannot be customized (Acquire Artifact, Transport Artifact, Build a Grail structure) by default allow the standard victory condition.
Special Loss condition[edit]
 None: The players lose when they lose all their towns and heroes, or they don't have any towns for a period of at least 7 days.
 Lose a specific town: The town must be specified. The first player (including AI) to lose this town loses the game. The town does not have to be under the control of any players for this condition to be set. If the town is neutral, conquering it for the first time will not result in a victory/loss.
 Lose a specific hero: The first player (including AI) to lose this hero loses the game. Note, that the hero may be imprisoned.
 Time expires: The first human player to start their turn on the chosen date loses the game.
Timed Events[edit]
An unlimited number of timed events can be added. Timed events automatically sort by date, but their order on a specific day can be customized, using "Move Up" and "Move Down" buttons. The following properties of events may be edited:
- General:
- Event name: This name only appears in the Map Editor and can help the mapmaker organize their work.
- Message: This message will play out to the players as the Event takes place.
- Players to which it applies: Specific players may be added to ignore this event. At least one player has to be marked.
- Apply event to human players: If ticked, the event will also apply to humans.
- Apply event to computer players: If ticked, the event will also apply to AI. Note, that at least one of these two options has to be marked.
- Day of first occurrence: The event will play on the chosen date.
- Subsequent occurrences: If set to "Never", the event will not repeat. If set to a different value, the event will repeat every chosen time interval. Note, that repeating events take priority over other events lower down the list.
- Resources: Here, resources given or taken from the player to which the event applies may be customized.
Note that some timed events only apply to specific towns. See: Map Editor - Objects#Town properties
Heroes[edit]
The mapmaker can ban, enable and edit chosen heroes. This includes campaign heroes (such as Gelu, Dracon or Frederick, as well as banned-by-default heroes (such as Galthran in Horn of the Abyss).
Editing Heroes[edit]
For editing heroes placed on the map, see Map Editor - Objects#Hero properties.
Heroes can be customized on the map as a whole in the following ways:
- General
- Name.
- Experience (and Experience level ).
- Portrait. Note, that portraits can repeat between different heroes; on top of that, heroes may use campaign portraits.
- Gender. This only changes the appearance on the map.
- Always add skills : If set to true, the hero will gain extra skills from the additional experience customized above.
- Hero can't gain experience : If set to true, the hero will not be able to gain any experience, no matter the experience level limit for the map.
- May be hired by: The following players may hire this hero. Other players will not see the hero in the tavern, or in the Adventure Map Tavern. Note, that heroes in Prisons or Hero Camps
 may be hired, even if this option states otherwise.
- Biography.
- Primary skills: These are the starting primary skills. Higher level heroes will be automatically levelled up, and therefore will have the appropriately higher primary skills.
- Secondary skills: These are the starting secondary skills. See Primary skills.
- Artifacts: Various artifacts, excluding the Grail and Spell scrolls (available in Horn of the Abyss), may be added here.
- Has spellbook.
- Spells: These spells will appear in the hero's spellbook, provided he has one, at the beginning of the game.
Note, that specialities and starting armies may not be customized. Therefore it is advised to customize a hero with the appropriate specialty to fit your desired hero.
Artifacts[edit]
Chosen artifacts may be banned here. They will not be randomly spawned as a reward or as a replacement for Random Artifacts. They may still be added to Heroes, Creature Banks, Seer's Hut rewards or placed on the map by the mapmaker.
Spells[edit]
The mapmaker may ban chosen spells here (only in Shadow of Death and Horn of the Abyss Map Editor). They will not randomly spawn in Mage guilds or Spell scrolls and won't be accessible from artifacts such as Spell scrolls, Tomes of elements or the Spellbinder's Hat. Adding them to a Mage guild manually won't work.
Secondary skills[edit]
Available secondary skills can be customized by banning or enabling chosen skills. Heroes who start with a banned skill will still be able to upgrade them, but other heroes won't be able to learn these skills, apart from the Universities (as long as they're customized to give the chosen skill), customized Scholars, Events and Pandora's Boxes. Witch Huts will automatically ignore banned skills when choosing a random skill to teach, and if customized to only provide a banned skill, will appear empty, with an appropriate message.
User commentary
[Show user commentary]
[Hide user commentary]
|
|
|
Gallery[edit]
-
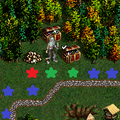
Road and monster-guarded cells explained
(identical in the HotA Map Editor )
-
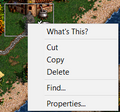
Right-clicking objects in the Map Editor
(identical in the Shadow of Death Map Editor )
-
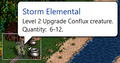
What's This? For monsters
-
Right-clicking monsters on the right bar of the Map Editor
(identical in the Shadow of Death Map Editor )
-
Warning that displays when hero limit is exceeded
(identical in the Shadow of Death Map Editor )
-

Warning that displays when no player is chosen when placing a hero
(identical in the Shadow of Death Map Editor )
-
Add artifact to hero
-
Add artifact to hero (Horn of the Abyss)
-
Lighthouse properties


.png)

See also:
- Map Editor
- Map Attributes
- Map Editor - Objects
- Map Editor - Guide
- Map Editor - Guide - Seer's Hut quests
External resources (in Polish only):
- Edytor Map bez tajemnic - jak skutecznie z niego korzystać. [English title: Map Editor - how to successfully use it].
- Mapa Przygody - część 1: Wypełnienie mapy. [English title: Adventure Map - part 1: Filling the map].
- Mapa Przygody - część 2: Zagospodarowanie terenu. [English title: Adventure Map - part 2: Land development].