Dreadnought and Juggernaut: Difference between revisions
mNo edit summary |
mNo edit summary |
||
| (6 intermediate revisions by 4 users not shown) | |||
| Line 26: | Line 26: | ||
| No_ushots = | | No_ushots = | ||
}} | }} | ||
{{Cram|Gantry|ext1=png|Dreadnought|Juggernaut|no_dwelling=}} | |||
'''Dreadnoughts and Juggernauts''' are one half of the level 7 creatures of [[Factory]]. They are recruited from the [[Gantry]]. | |||
{{clear|left}} | |||
== Special Ability: Heat Stroke == | == Special Ability: Heat Stroke == | ||
[[File:Heat stroke.png]] Heat Stroke can be activated instead of moving or attacking for the turn. It fires a laser that deals damage to all units within the targeted semi-circular area, hitting 7-8 hexes; 3 hexes adjacent and 4-5 hexes behind that. The damage is based on the number of Dreadnoughts/Juggernauts in the stack and is affected by Dreadnoughts/Juggernauts' [[Attack]], | [[File:Heat stroke.png]] Heat Stroke can be activated instead of moving or attacking for the turn. It fires a laser that deals damage to all units within the targeted semi-circular area, hitting 7-8 hexes; 3 hexes adjacent and 4-5 hexes behind that. The damage is based on the number of Dreadnoughts/Juggernauts in the stack and is affected by Dreadnoughts/Juggernauts' [[Attack]], targets' [[Defense]] and other usual melee modifiers (like [[Offense]]). Damage dealt is practically same per target stack as would be from usual Dreadnought/Juggernaut attack to corresponding stack. Heat Stroke can damage friendly creatures in the area. Enemies do not retaliate against a Heat Stroke. | ||
== Appearance == | |||
A Dreadnought appears in the epilogue of the [[Deus Ex Machina]] scenario from the [[Forged in Fire]] campaign in {{hota}}. Dreadnoughts and Juggernauts also appear in the epilogue of the [[Homecoming (HotA)|Homecoming]] scenario in the same campaign. | |||
{{video|HotA 1.7.0-Data-HotA vid-Factory5B-bik-Factory5B|550px}} | |||
{{video|HotA 1.7.0-Data-HotA vid-Factory8B-bik-Factory8B|550px}} | |||
== Official Renders == | |||
<gallery mode="packed-hover"> | |||
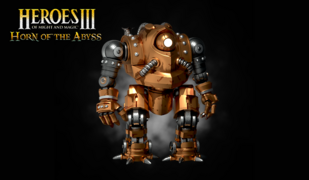
Dreadnought render.png | |||
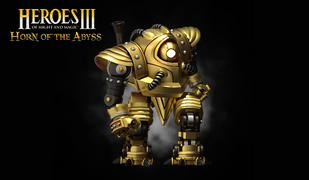
Juggernaut render.png | |||
Dreadnought evolution.png | |||
Juggernaut evolution.png | |||
</gallery> | |||
{{fanopinion| | |||
In comparison to their peers, Dreadnoughts and Juggernauts have average attack skill, above average defence skill and high health. Their damage range is good, allowing them to deal both high and solid damage against their opponents. Dreadnoughts and Juggernauts are also immune to [[mind spell|mind spells]]. Heat Stroke gives both a chance to attack without retaliation, but can also damage your troops, too. Their good defence, high health and Heat Stroke makes them a very good option to fill breached walls, tank damage and blast units stuck or standing right behind [[moat]]. | |||
On the flip side, they are among the slowest of level 7 units: Juggernauts are the slowest upgraded level 7 unit along with [[Hydra and Chaos Hydra|Chaos Hydras]]. Being [[mechanical]] units, they are unaffected by [[morale]] and resurrecting them is completely dependant on your [[Mechanic and Engineer|Mechanics and Engineers]]. Their unit cost is somewhat high, especially when considering same amount of gold and rare resources is required to recruit [[Red Dragon and Black Dragon|Red Dragons and Black Dragons]], which are more resistant and naturally more suited for offensive operations. | |||
[[Tactics]], [[Offense]] and [[Armorer]] are good secondary skills to support Dreadnoughts and Juggernauts. If you take them in sieges, [[Ballistics]] would be a recommended skill as well. Useful spells include [[Haste]] and [[Prayer]] to improve their speed, [[Teleport|Expert Teleport]] to optimize the use of Heat Stroke or to place them behind walls, and [[Bloodlust]] to improve damage for both normal attack and Heat Stroke. If you fight against Dreadnoughts or Juggernauts, spells like [[Slow]], [[Quicksand]] and [[Force Field]] will cripple them further, making them relatively easy prey for ranged units. [[Fire Magic|Expert Fire Magic]] is required for [[Slayer]] to take effect against them. Avoid taking melee contact with two or more stacks and try to lure other enemy creatures in their range to minimalize the benefits of Heat Stroke. Also, avoid leaving a one hex gap between you and Dreadnoughts, as you may get surprised by Heat Stroke. | |||
When compared with [[Couatl and Crimson Couatl|Couatls and Crimson Couatls]], Dreadnoughts and Juggernauts pose more threat and durability in direct combat, but as Couatls are cheaper (both dwelling and unit-wise), faster and can fly, they should be prioritized first, as they are cheaper and more usable in taking over towns. In turn, Dreadnoughts and Juggernauts excel better in town defence, where they can fill gaps, soak up damage and deal damage to several targets without retaliation. Later on, as you accumulate more gold and crystal, Juggernauts can become a viable option to replace slower [[Halfling and Halfling Grenadier|Halflings]] or [[Armadillo and Bellwether Armadillo|Armadillos]] in your army. | |||
}}<!-- end of fan opinion --> | |||
{{creature 'see also'}} | {{creature 'see also'}} | ||
Revision as of 17:13, 20 August 2024
| Level 1 | |||||||||||||||
|---|---|---|---|---|---|---|---|---|---|---|---|---|---|---|---|
| Level 2 | |||||||||||||||
| Level 3 | |||||||||||||||
| Level 4 | |||||||||||||||
| Level 5 | |||||||||||||||
| Level 6 | |||||||||||||||
| Level 7a | |||||||||||||||
| Level 7b | |||||||||||||||
| Towns | |||||||||||||||
|
| |||||||||||||||
| Statistics | ||||||||||||||||||
|---|---|---|---|---|---|---|---|---|---|---|---|---|---|---|---|---|---|---|
| Dreadnought | ||||||||||||||||||
| ||||||||||||||||||
| ||||||||||||||||||
| Special abilities: | ||||||||||||||||||
| • Mechanical • Heat stroke | ||||||||||||||||||
| Juggernaut | ||||||||||||||||||
| ||||||||||||||||||
| ||||||||||||||||||
| Special abilities: | ||||||||||||||||||
| • Mechanical • Heat stroke | ||||||||||||||||||
Portraits
| ||||||||||||||||||

|

|

|
Dreadnoughts and Juggernauts are one half of the level 7 creatures of Factory. They are recruited from the Gantry.
Special Ability: Heat Stroke
![]() Heat Stroke can be activated instead of moving or attacking for the turn. It fires a laser that deals damage to all units within the targeted semi-circular area, hitting 7-8 hexes; 3 hexes adjacent and 4-5 hexes behind that. The damage is based on the number of Dreadnoughts/Juggernauts in the stack and is affected by Dreadnoughts/Juggernauts' Attack, targets' Defense and other usual melee modifiers (like Offense). Damage dealt is practically same per target stack as would be from usual Dreadnought/Juggernaut attack to corresponding stack. Heat Stroke can damage friendly creatures in the area. Enemies do not retaliate against a Heat Stroke.
Heat Stroke can be activated instead of moving or attacking for the turn. It fires a laser that deals damage to all units within the targeted semi-circular area, hitting 7-8 hexes; 3 hexes adjacent and 4-5 hexes behind that. The damage is based on the number of Dreadnoughts/Juggernauts in the stack and is affected by Dreadnoughts/Juggernauts' Attack, targets' Defense and other usual melee modifiers (like Offense). Damage dealt is practically same per target stack as would be from usual Dreadnought/Juggernaut attack to corresponding stack. Heat Stroke can damage friendly creatures in the area. Enemies do not retaliate against a Heat Stroke.
Appearance
A Dreadnought appears in the epilogue of the Deus Ex Machina scenario from the Forged in Fire campaign in Horn of the Abyss. Dreadnoughts and Juggernauts also appear in the epilogue of the Homecoming scenario in the same campaign.
Official Renders
User commentary
[Show user commentary]
|
|
|


