Fortifications: Difference between revisions
ShushMaster (talk | contribs) No edit summary |
|||
| (24 intermediate revisions by 9 users not shown) | |||
| Line 1: | Line 1: | ||
{{buildings}} | {{buildings}} | ||
{{Fortifications}} | {{Fortifications}} | ||
As stated in the manual, castles provide increased security for towns. Fort adds [[wall]] to town's defenses. The wall is impassable by non-flying enemy creatures (without advanced [[Teleport]] spell), but has a drawbridge for defending creatures to pass through, back and forth if needed. Fort is | <span style="float:right">__TOC__</span> | ||
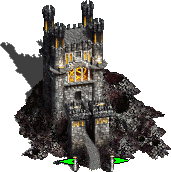
As stated in the manual, castles provide increased security for towns. Fort adds [[wall]] to town's defenses. The wall is impassable by non-flying enemy creatures (without advanced [[Teleport]] spell), but has a drawbridge for defending creatures to pass through, back and forth if needed. Fort is a prerequisite for all [[creature dwelling]]s. Additionally, building a Fort to a town changes the town's appearance on the [[adventure map]]. | |||
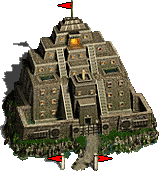
The upgrade to Fort is Citadel, which adds primary [[arrow tower]] to town's defenses, and also adds a [[moat]] in front of the wall. An exception to this are [[Tower]] towns, which do not have a moat but instead building a Citadel adds several [[Land Mine]]s in front of the wall. One of the greatest advantages of the moat is, that ground units end their movement to it, and cannot move further until their next round (see additional features [[Moat]] page). Note that this also works for defending creatures trying to get across the moat. Additionally, Citadel increases the creature dwellings' growth by 50%. | The upgrade to Fort is Citadel, which adds primary [[arrow tower]] to town's defenses, and also adds a [[moat]] in front of the wall. An exception to this are [[Tower]] towns, which do not have a moat but instead building a Citadel adds several [[Land Mine]]s in front of the wall. One of the greatest advantages of the moat is, that ground units end their movement to it, and cannot move further until their next round (see additional features [[Moat]] page). Note that this also works for defending creatures trying to get across the moat. Additionally, Citadel increases the creature dwellings' growth by 50%. | ||
The final defense structure is Castle, which adds two more (secondary) arrow towers and strengthens the wall. The two arrow towers have half the strength of the primary tower added by Citadel. Further, production of creature dwellings is increased by 100%. | The final defense structure is Castle, which adds two more (secondary) arrow towers and strengthens the wall. The two arrow towers have half the strength of the primary tower added by Citadel. Further, production of creature dwellings is increased by another 50% for a total of 100%. | ||
{| frame=box cellspacing=0 style="background-color:#{{ | {{clear|left}} | ||
== Types of fortifications == | |||
There are three different types of fortifications: | |||
* [[Walls|Town walls]], including [[Drawbridge]] | |||
* [[Arrow Towers]] | |||
* [[Moat|Moats]] | |||
== Fortifications strength== | |||
With the exception of the [[moat]] every part of the fortifications has a number of hitpoints which enable them to withstand only up to several attacks during a [[siege]]. Fortifications can only be damaged by: | |||
* {{Cn|Catapult}} | |||
* {{Cn|Cannon}}{{-wh}} | |||
* {{sn|Earthquake}} spell | |||
* {{Cnu|Cyclops|Cyclops King}} | |||
The following table shows the number of hitpoints for each type of fortifications: | |||
{| frame=box border cellspacing=0 cellpadding=4 style="background-color:#{{Purple 4}}; text-align:center; margin:5px 20px 10px 0px;" | |||
|- | |- | ||
! | ! colspan=4 style="background-color:#{{Purple 1}}A0!important; color:white"| Fortifications' hitpoints | ||
|- style="background-color:#{{Purple 2}}A0;" | |||
! | |||
|- style="background-color: | |||
| | | | ||
! style="text-align:center;"|[[File:buildings_Fort.gif|50px|link=]]<br>Fort !! [[File:buildings_Citadel.gif|50px|link=]]<br>Citadel !! [[File:buildings_Castle.gif|50px|link=]]<br>Castle | |||
|- | |||
| | ! [[Wall]] segment (4 segments) | ||
| | | 2 || 2 || 3 | ||
| | |- | ||
| | ! [[Drawbridge]] | ||
| | | 2 || 2 || 2 | ||
| | |- | ||
! [[Keep]] | |||
| | | - || 2 || 2 | ||
| | |- | ||
| | ! Secondary [[Arrow Towers]] | ||
| | | - || - || 2 | ||
| | |- | ||
| | |||
| | |} | ||
| | |||
| | == Adventure map == | ||
| | In {{sod}} there are just three visual appearances of a town: [[Village Hall|Village]], [[Fort]] and [[Capitol]] (as a [[Fort]] with a flag). But the exact fortification level (fort/citadel/castle) always can be checked by an icon in the rightclick menu (the [[Halls|hall]] level is visible just for allies). | ||
| | |||
| | [[Horn of the Abyss]] represents towns accurately to their level of fortification. | ||
| | {{towns on adventure map table}} | ||
| | |||
|- | ==In-town appearance== | ||
| | {| border cellpadding="4" style="border:1 solid; text-align:center; background-color:#{{Purple 4}}; margin-right:20px; margin-bottom:10px; float:left;" | ||
| | | {{swh|[[File:Adventure Map Castle capitol (HotA).webp|x75px|Castle|link=Castle]]|[[File:Adventure Map Castle capitol.webp|x75px|Castle|link=Castle]]|noicon=}}<p>[[Castle]] || [[File:Castle Fort large.gif]] || [[File:Castle Citadel large.gif]] || [[File:Castle Castle large.gif]] | ||
| | |- | ||
| | | {{swh|[[File:Adventure Map Rampart capitol (HotA).webp|x75px|Rampart|link=Rampart]]|[[File:Adventure Map Rampart capitol.webp|x75px|Rampart|link=Rampart]]|noicon=}}<p>[[Rampart]] || [[File:Rampart Fort large.gif]] || [[File:Rampart Citadel large.gif]] || [[File:Rampart Castle large.gif]] | ||
| | |- | ||
| | | {{swh|[[File:Adventure Map Tower capitol (HotA).webp|x75px|Tower|link=Tower]]|[[File:Adventure Map Tower capitol.webp|x75px|Tower|link=Tower]]|noicon=}}<p>[[Tower]] || [[File:Tower Fort large.gif]] || [[File:Tower Citadel large.gif]] || [[File:Tower Castle large.gif]] | ||
| | |- | ||
| | | {{swh|{{watchable|Adventure Map Inferno capitol (HotA).webp|width=75|hover=Inferno|link=Inferno}}|[[File:Adventure Map Inferno capitol.webp|x75px|Inferno|link=Inferno]]|noicon=}}<p>[[Inferno]] || [[File:Inferno Fort large.gif]] || [[File:Inferno Citadel large.gif]] || [[File:Inferno Castle large.gif]] | ||
| | |- | ||
| | | {{swh|[[File:Adventure Map Necropolis capitol (HotA).webp|x75px|Necropolis|link=Necropolis]]|[[File:Adventure Map Necropolis capitol.webp|x75px|Necropolis|link=Necropolis]]|noicon=}}<p>[[Necropolis]] || [[File:Necropolis Fort large.gif]] || [[File:Necropolis Citadel large.gif]] || [[File:Necropolis Castle large.gif]] | ||
| | |- | ||
| | | {{swh|[[File:Adventure Map Dungeon capitol (HotA).webp|x75px|Dungeon|link=Dungeon]]|[[File:Adventure Map Dungeon capitol.webp|x75px|Dungeon|link=Dungeon]]|noicon=}}<p>[[Dungeon]] || [[File:Dungeon Fort large.gif]] || [[File:Dungeon Citadel large.gif]] || [[File:Dungeon Castle large.gif]] | ||
| | |- | ||
|- | | {{swh|[[File:Adventure Map Stronghold capitol (HotA).webp|x75px|Stronghold|link=Stronghold]]|[[File:Adventure Map Stronghold capitol.webp|x75px|Stronghold|link=Stronghold]]|noicon=}}<p>[[Stronghold]] || [[File:Stronghold Fort large.gif]] || [[File:Stronghold Citadel large.gif]] || [[File:Stronghold Castle large.gif]] | ||
|- | |||
| {{swh|{{watchable|Adventure Map Fortress capitol (HotA).webp|width=75|hover=Fortress|link=Fortress}}|[[File:Adventure Map Fortress capitol.webp|x75px|Fortress|link=Fortress]]|noicon=}}<p>[[Fortress]] || [[File:Fortress Fort large.gif]] || [[File:Fortress Citadel large.gif]] || [[File:Fortress Castle large.gif]] | |||
| | |- | ||
| {{swh|[[File:Adventure Map Conflux capitol (HotA).webp|x75px|Conflux|link=Conflux]]|[[File:Adventure Map Conflux capitol.webp|x75px|Conflux|link=Conflux]]|noicon=}}<p>[[Conflux]] || [[File:Conflux Fort large.gif]] || [[File:Conflux Citadel large.gif]] || [[File:Conflux Castle large.gif]] | |||
|- class=onlyhota | |||
| | | [[File:Adventure Map Cove capitol.webp|x75px|Cove|link=Cove]]<p>[[Cove]]{{-wh}} || [[File:Cove Fort large.gif]] || [[File:Cove Citadel large.gif]] || [[File:Cove Castle large.gif]] | ||
|- | |- class=onlyhota | ||
| | | {{watchable|Adventure Map Factory capitol.webp|width=75|hover=Factory|link=Factory}}<p>[[Factory]]{{-wh}} || [[File:Factory Fort large.gif]] || [[File:Factory Citadel large.gif]] || [[File:Factory Castle large.gif]] | ||
| | |- class=onlyhota | ||
| | | [[File:Adventure Map Bulwark capitol.webp|x75px|Bulwark|link=Bulwark]]<p>[[Bulwark]]{{-wh}} || [[File:Bulwark Fort large.png]] || [[File:Bulwark Citadel large.png]] || [[File:Bulwark Castle large.png]] | ||
| | |||
| | |||
| | |||
|- | |||
| | |||
| | |||
| | |||
| | |||
| | |||
| | |||
| | |||
| | |||
|} | |} | ||
[[Category: Buildings common to all towns]] | [[Category: Buildings common to all towns]] | ||
Latest revision as of 04:00, 3 January 2026
| Fortifications | ||||||||
|---|---|---|---|---|---|---|---|---|
| Structure | Cost | Requirements | Benefits | |||||
 Fort |
5000 20 20 |
• Village Hall | Adds walls to a town | |||||
 Citadel |
2500 5 |
• Fort | Adds moat and primary arrow tower to a town. Increases production of creature dwellings by 50%. | |||||
 Castle |
5000 10 10 |
• Citadel | Adds two secondary arrow towers, standard walls are strengthened to fortified walls. Increases production of creature dwellings by 100%. | |||||
As stated in the manual, castles provide increased security for towns. Fort adds wall to town's defenses. The wall is impassable by non-flying enemy creatures (without advanced Teleport spell), but has a drawbridge for defending creatures to pass through, back and forth if needed. Fort is a prerequisite for all creature dwellings. Additionally, building a Fort to a town changes the town's appearance on the adventure map.
The upgrade to Fort is Citadel, which adds primary arrow tower to town's defenses, and also adds a moat in front of the wall. An exception to this are Tower towns, which do not have a moat but instead building a Citadel adds several Land Mines in front of the wall. One of the greatest advantages of the moat is, that ground units end their movement to it, and cannot move further until their next round (see additional features Moat page). Note that this also works for defending creatures trying to get across the moat. Additionally, Citadel increases the creature dwellings' growth by 50%.
The final defense structure is Castle, which adds two more (secondary) arrow towers and strengthens the wall. The two arrow towers have half the strength of the primary tower added by Citadel. Further, production of creature dwellings is increased by another 50% for a total of 100%.
Types of fortifications[edit | hide | hide all]
There are three different types of fortifications:
- Town walls, including Drawbridge
- Arrow Towers
- Moats
Fortifications strength[edit | hide]
With the exception of the moat every part of the fortifications has a number of hitpoints which enable them to withstand only up to several attacks during a siege. Fortifications can only be damaged by:
The following table shows the number of hitpoints for each type of fortifications:
| Fortifications' hitpoints | |||
|---|---|---|---|
Fort |
Citadel |
Castle | |
| Wall segment (4 segments) | 2 | 2 | 3 |
| Drawbridge | 2 | 2 | 2 |
| Keep | - | 2 | 2 |
| Secondary Arrow Towers | - | - | 2 |
Adventure map[edit | hide]
In The Shadow of Death there are just three visual appearances of a town: Village, Fort and Capitol (as a Fort with a flag). But the exact fortification level (fort/citadel/castle) always can be checked by an icon in the rightclick menu (the hall level is visible just for allies).
Horn of the Abyss represents towns accurately to their level of fortification.
| |
Village |
Fort |
Citadel |
Castle |
Capitol |
|---|---|---|---|---|---|

|
.webp) 
|
.webp)
|
.webp)
|
.webp) 
| |

|
.webp) 
|
.webp)
|
.webp)
|
.webp) 
| |

|
.webp) 
|
.webp)
|
.webp)
|
.webp) 
| |
.webp)
|
.webp) 
|
Media:Adventure Map Inferno citadel (HotA).webp | Media:Adventure Map Inferno castle (HotA).webp | Media:Adventure Map Inferno capitol (HotA).webpMedia:Adventure Map Inferno capitol.webp | |

|
.webp) 
|
.webp)
|
.webp)
|
.webp) 
| |

|
.webp) 
|
.webp)
|
.webp)
|
.webp) 
| |

|
.webp) 
|
.webp)
|
.webp)
|
.webp) 
| |

|
.webp) 
|
.webp)
|
Media:Adventure Map Fortress castle (HotA).webp | Media:Adventure Map Fortress capitol (HotA).webpMedia:Adventure Map Fortress capitol.webp | |
.webp) 
|
.webp) 
|
.webp)
|
.webp)
|
.webp) 
| |
.webp)
|
.webp)
|
.webp)
|
.webp)
|
.webp)
| |
.webp)
|
.webp)
|
.webp)
|
Media:Adventure Map Factory castle.webp | Media:Adventure Map Factory capitol.webp | |

|

|

|

|

|
In-town appearance[edit | hide]
  |
 |
 |

|
  |
 |
 |

|
  |
 |
 |

|
Media:Adventure Map Inferno capitol (HotA).webp |
 |
 |

|
  |
 |
 |

|
  |
 |
 |

|
  |
 |
 |

|
Media:Adventure Map Fortress capitol (HotA).webp |
 |
 |

|
  |
 |
 |

|
 |
 |
 |

|
| Media:Adventure Map Factory capitol.webp |  |
 |

|
 |
 |
 |

|